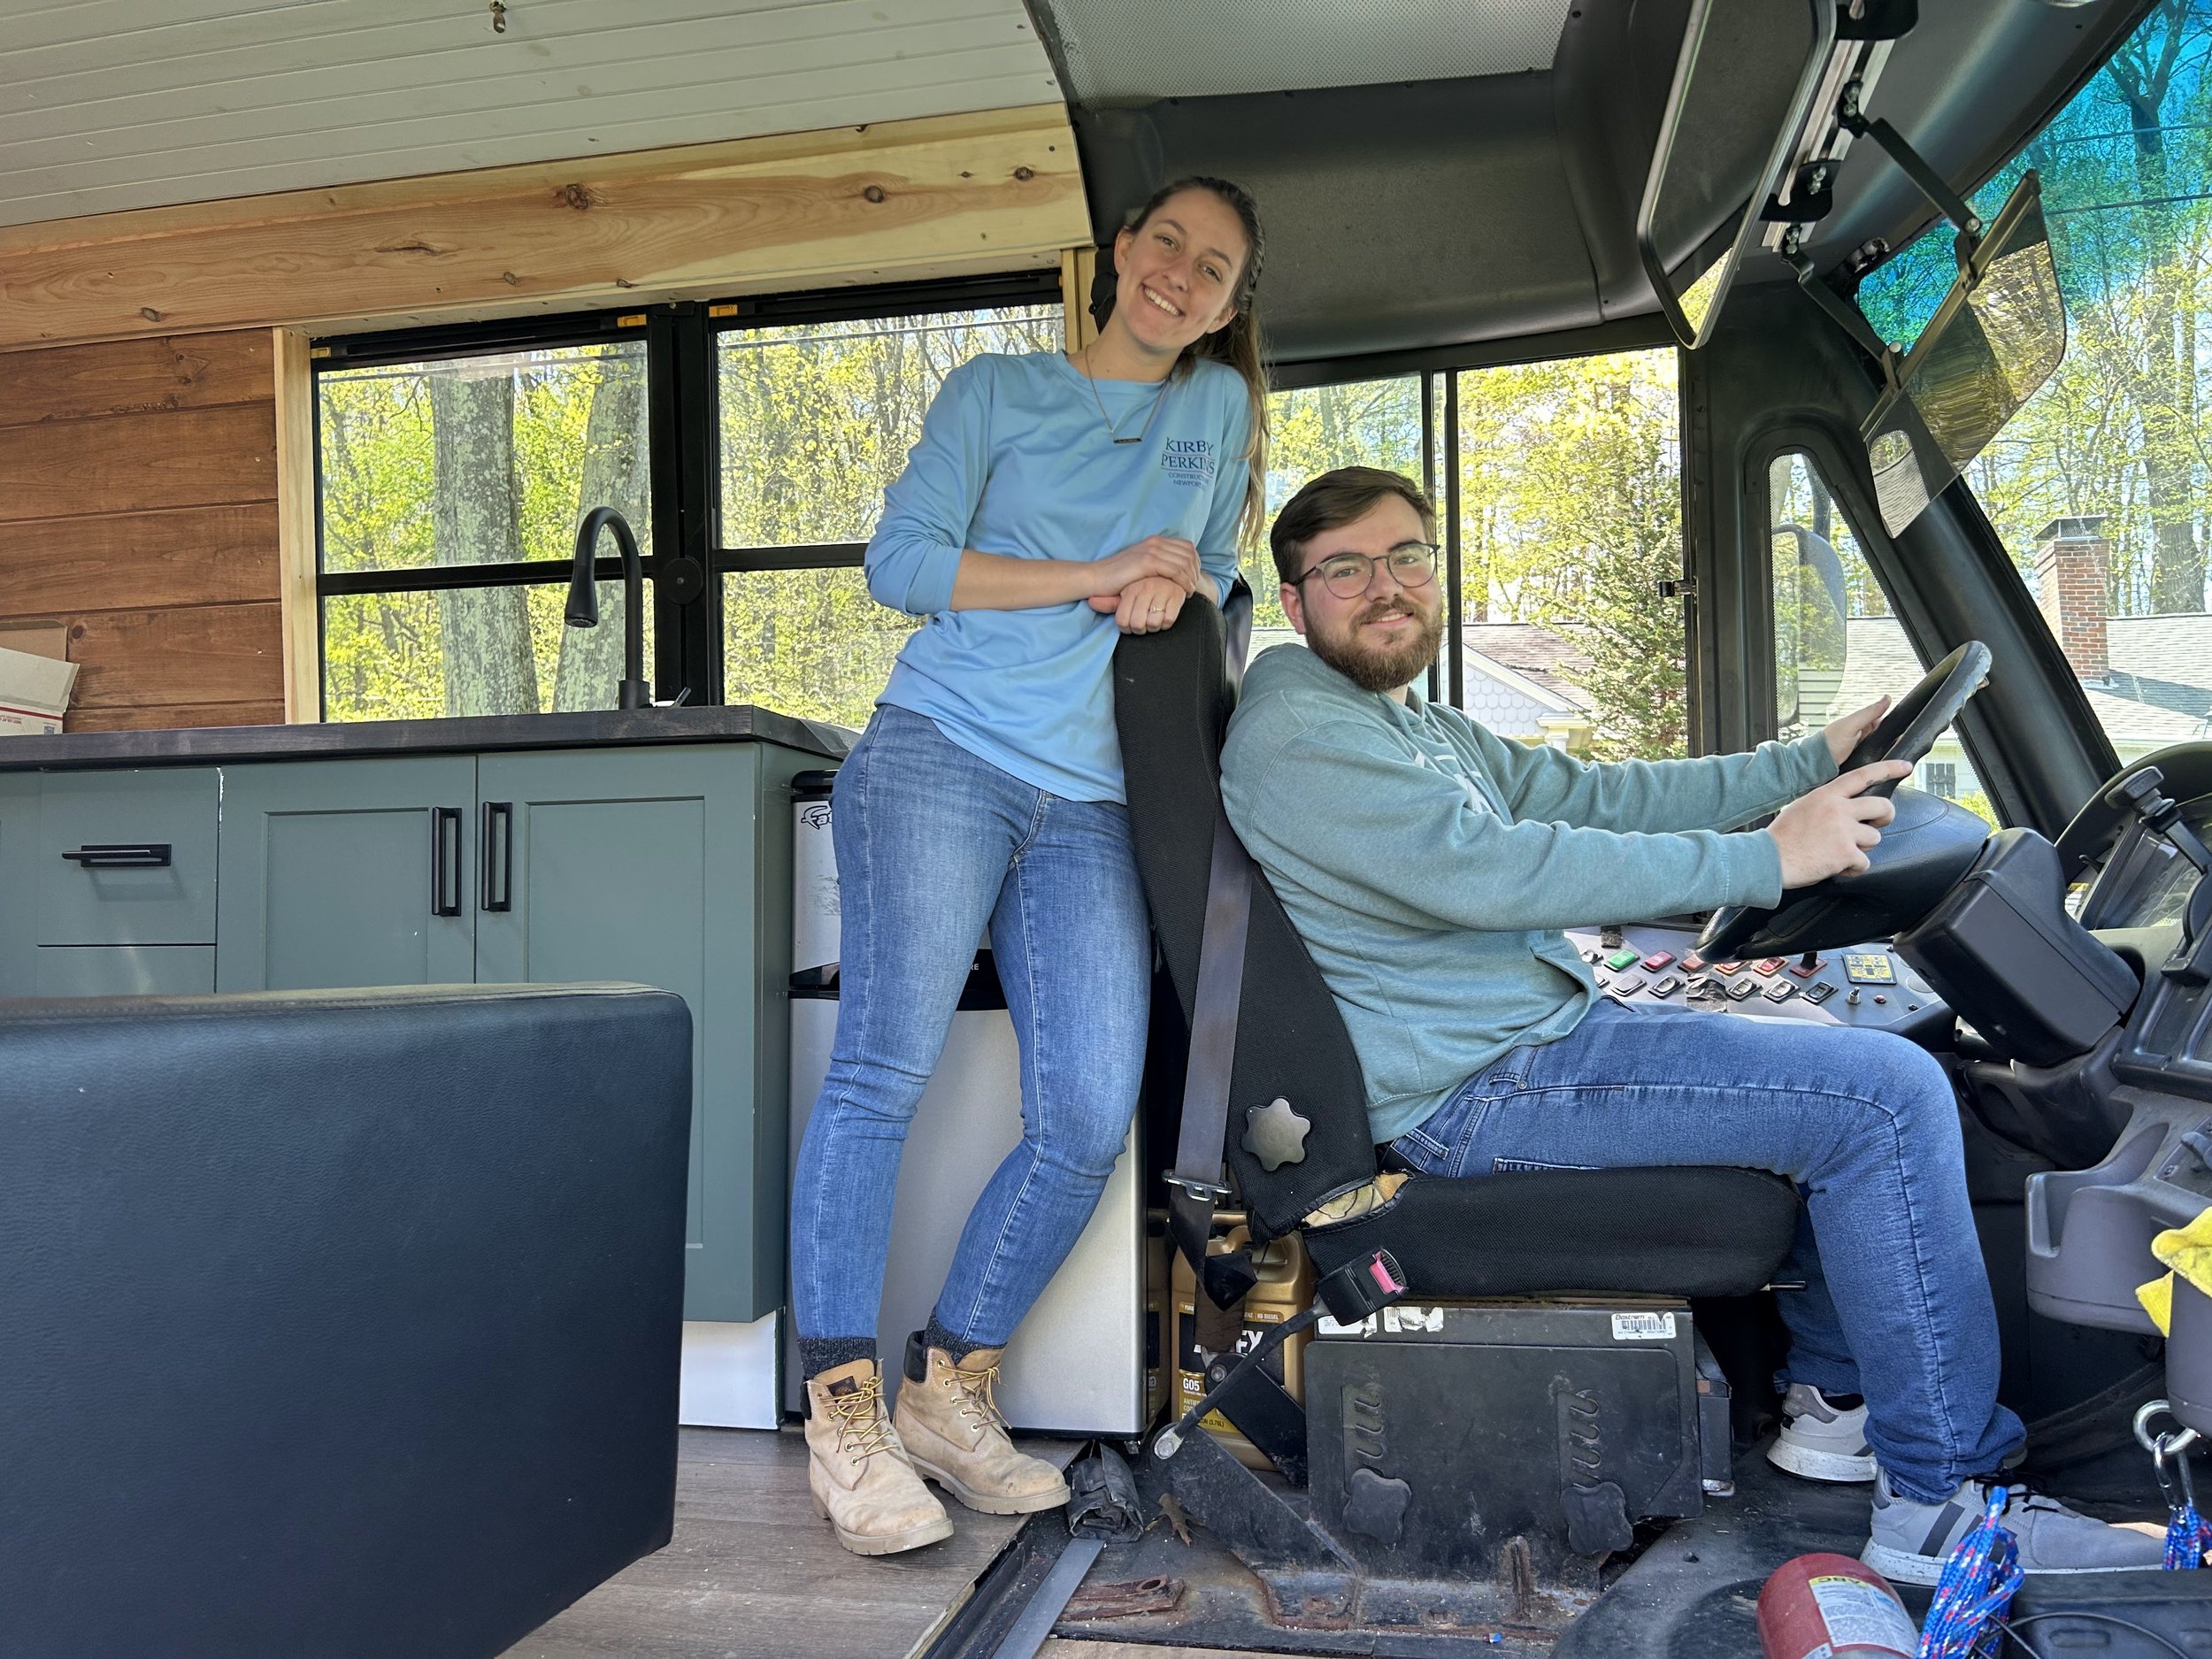
Our Conversion

From the day we brought it home, to the day we took it on the road, here is the weekend-by-weekend process of building our Skoolie! You can find some of the good updates on our Instagram but this is the good, the bad, and the ugly. This is a long one, but it was a long journey from start to finish and I wasn’t going to leave anything out just in case you’re thinking about building your own school bus tiny home and need some inspiration (or advice on what not to do).
MAY 6, 2023 - The Day We Brought It Home


When we first bought the bus, we were both working full time jobs in person and living in an apartment with no room to park a project like this. So, we had a conversation with Cole’s parents about keeping the bus at a storage unit nearby during the week and driving it to their house every weekend to use their yard and garage to do our conversion. “It’ll only be a few months” we said. "It’ll only be here on the weekends” we said. We meant it.
However, the day we pulled it into their yard was the day we found out we needed all new brake lines and since it already took one miracle for us to have gotten it from the Facebook Marketplace seller’s house to my in-law’s, we weren’t going to push our luck and drive it anywhere else. By the time we were able to get a mobile mechanic out to fix our brakes, everyone had already gotten used to it being in the yard. So, we cancelled our storage unit and there it sat. That first weekend was spent planning our demolition, taking measurements, and drawing out floor plans. Every weekend after that, until June 2024, Cole and I would drive the hour to his parent’s house, stay the weekend, and work Saturday and Sunday to try to finish this conversion.
MAY 13, 2023 - The Work Begins


We bought our bus half-converted. The guy who owned it before us used it as a toy hauler so the back 10 feet were pretty much untouched. The walls were cut open, nothing was insulated, the back windows had been smashed out, the original ceiling and walls were intact, and the floors were unsealed and molding. The agenda for our first weekend of work was to tear out the original sheet metal ceiling and walls, and frame the holes in the sides to get ready to close them up.
Before we got to work we took our first trip to Home Depot. So full of hope, we didn’t know we’d have every inch of that place memorized by the time we finished our conversion. We actually dropped the “Depot” at one point and just started calling it “Home.”

After that, we jumped into removing the sheet metal ceiling. Taking out the million screws went fine, then when we actually started removing panels, we discovered they had been JB Welded to the frame of the bus so Cole used a pry bar and a hammer to crack the glue while his dad and I ripped the metal down.
That was the first weekend we said “well that took longer than we expected it to.” We have said that every weekend since.
By like 9:00PM we started cutting the metal sheets off the walls and called it a day after finishing one side.

On Sunday, we finished removing the metal from the interior walls and started framing the openings. As always, we had more on our to-do list than hours in the day so we completed the framing on one wall, had to clean up our construction site, and make the hour drive (2 hours for me) back to our apartments to be ready for work on Monday.


June 2, 2023 - Back to Work After Graduation and Moving Out


The weekend of May 20th I graduated from college, and the weekend after, the 27th, I moved out of my college house and into Cole’s apartment. We didn’t do any work graduation weekend, but Cole was able to take the old brake lines out on the 28th after my move. It didn’t feel great to lose almost two weekends of work but life comes at you fast.
The first weekend in June we wasted no time getting to work. We drove to Cole’s parent’s house Friday night and worked until around 10:00 PM taking up the old flooring in the open section of the bus. The next day we sanded the layer of rust off of the metal floor we exposed Friday night and finished framing the second opening in the wall.


That meant that we could spend Sunday cutting and hanging sheet metal on the outside walls to close up the openings, giving us more living space. That process took both of us and Cole’s dad to complete. We first put down a layer to sealant around the edges of the wall opening, then two of us had to lift and hold the sheet metal in place while the third secured it with the first screws on both sides. From there we continued to work together, one person keeping it steady and the other two pre-drilling holes and drilling screws into place.
We were able to get one wall closed before needing to end our weekend of work but we felt accomplished.


June 10, 2023 - The Rest of the Sheet Metal and Some New Windows
We jumped into working on Saturday by covering the back emergency door window that had been broken out with a small sheet of metal and the two side windows next to it with plexiglass we cut by hand and secured with sealant and screwed into place. When that was done, it was getting late so we applied the first coat of waterproof sealant to the floor and called it a night.


Sunday morning we added a second coat of waterproofing to the floor and got half of the second wall opening covered with sheet metal. We then realized we had made the wrong cut length wise in our sheet metal and since we had ordered the exact amount we were going to need, we ended up ordering one more sheet and having to wait for it to come in before we could officially close up our walls. It was always something.


June 17-24, 2023 - Chipping Away Here and There
If you lived in New England during the summer of 2023 you would know that it’s not an exaggeration when I say it rained every. Single. Weekend. So the last two weekends in June were spent doing what we could in the bad weather. Mostly it was cleaning up some things in the engine, and trying to fix our parking brake wire issue (that wasn’t fixed until May 2025).


I haven’t mentioned it yet but during this process we were also planning our wedding so I ended up taking a trip to spend the 4th of July with my family while also scoping out wedding venues in Florida. The weekend after that was our engagement party. Cole did plenty of plumbing and electrical work while I was away so it was never a total wash when I was gone (hard to believe, I know), but we were anxious to really see some progress after three slow weekends.
July 22, 2023 - It Stopped Raining
We finally got back to work and on July 22nd, we were able to add the last of the sheet metal, closing off the back 10 feet of the bus at last. Our next task was to break down the wall the previous owner had built to separate his living space from his toy hauling space. The bed frame was built into the wall so we removed that first and by the time we were finished with that it was time to get some sleep.


On Sunday we broke down the wall, making it one big tiny home. We also laid the first piece of insulation on the floor before packing it up for the weekend.


July 29, 2023 - Insulating the Floor and Spending a lot of Time Waiting
I lost track of the amount of glue tubes we went through the weekend of July 29th. We loaded up a Home Depot van with 2 inch thick insulation boards and an insane amount of plywood. We glued the insulation boards to the sealed metal floor and glued the plywood sheets on top. We then filled every bucket and cooler we could find with water to make weights to press the subfloor down while the glue dried. Then all we could do was wait.


August 6, 2023 - Prepping for Walls and a Ceiling
Now that the walls were closed and the subfloor was in, it was time to put up the strapping for our interior walls and ceiling. We just passed sheets of plywood over a table saw a million times until we had a ton of 2 inch wide strips to use as strapping. After that we spent the entire rest of the weekend putting it all up. It was an easy enough task, it just took forever.


The next weekend I flew to Florida to road trip to Alabama to move my sister into college and celebrate my dad’s 50th. The weekend after that, Cole and I had an event on Saturday so we took the whole weekend off, another two weekends without progress but it was a nice break.
August 26, 2023 - Pulling Wires and Spray Foaming (Spraying Foam?)
This was a big one. We had to commit to our electrical and framing plans because a big ol’ Amazon package of spray foam insulation canisters and a Tyvek suit had arrived. Saturday we ran wires throughout the ceiling and put our personal touches on the framing in the form of Bible verses and signing our names.


On Sunday it was time to suit up and insulate. It was a pretty quick process (maybe we could’ve taken it slower and it would’ve been prettier but its functional). After that, we had to wait for the foam to dry and the fumes to dissipate, so we cleaned up and headed home.


September 1, 2023 - Finding Mold and Backtracking
There were many points in this journey where we ran into a problem, looked at each other, and said “we’ve done too much work to give up now.” This was the first. With the back closed up and insulated it was time to strip the furniture from the front and redesign. When we moved the mini fridge we found water. A pretty significant amount of water that looked like it had been there a long time. We knew there had to be mold under there so we painfully decided to rip up and replace the entire subfloor the previous owner had installed.


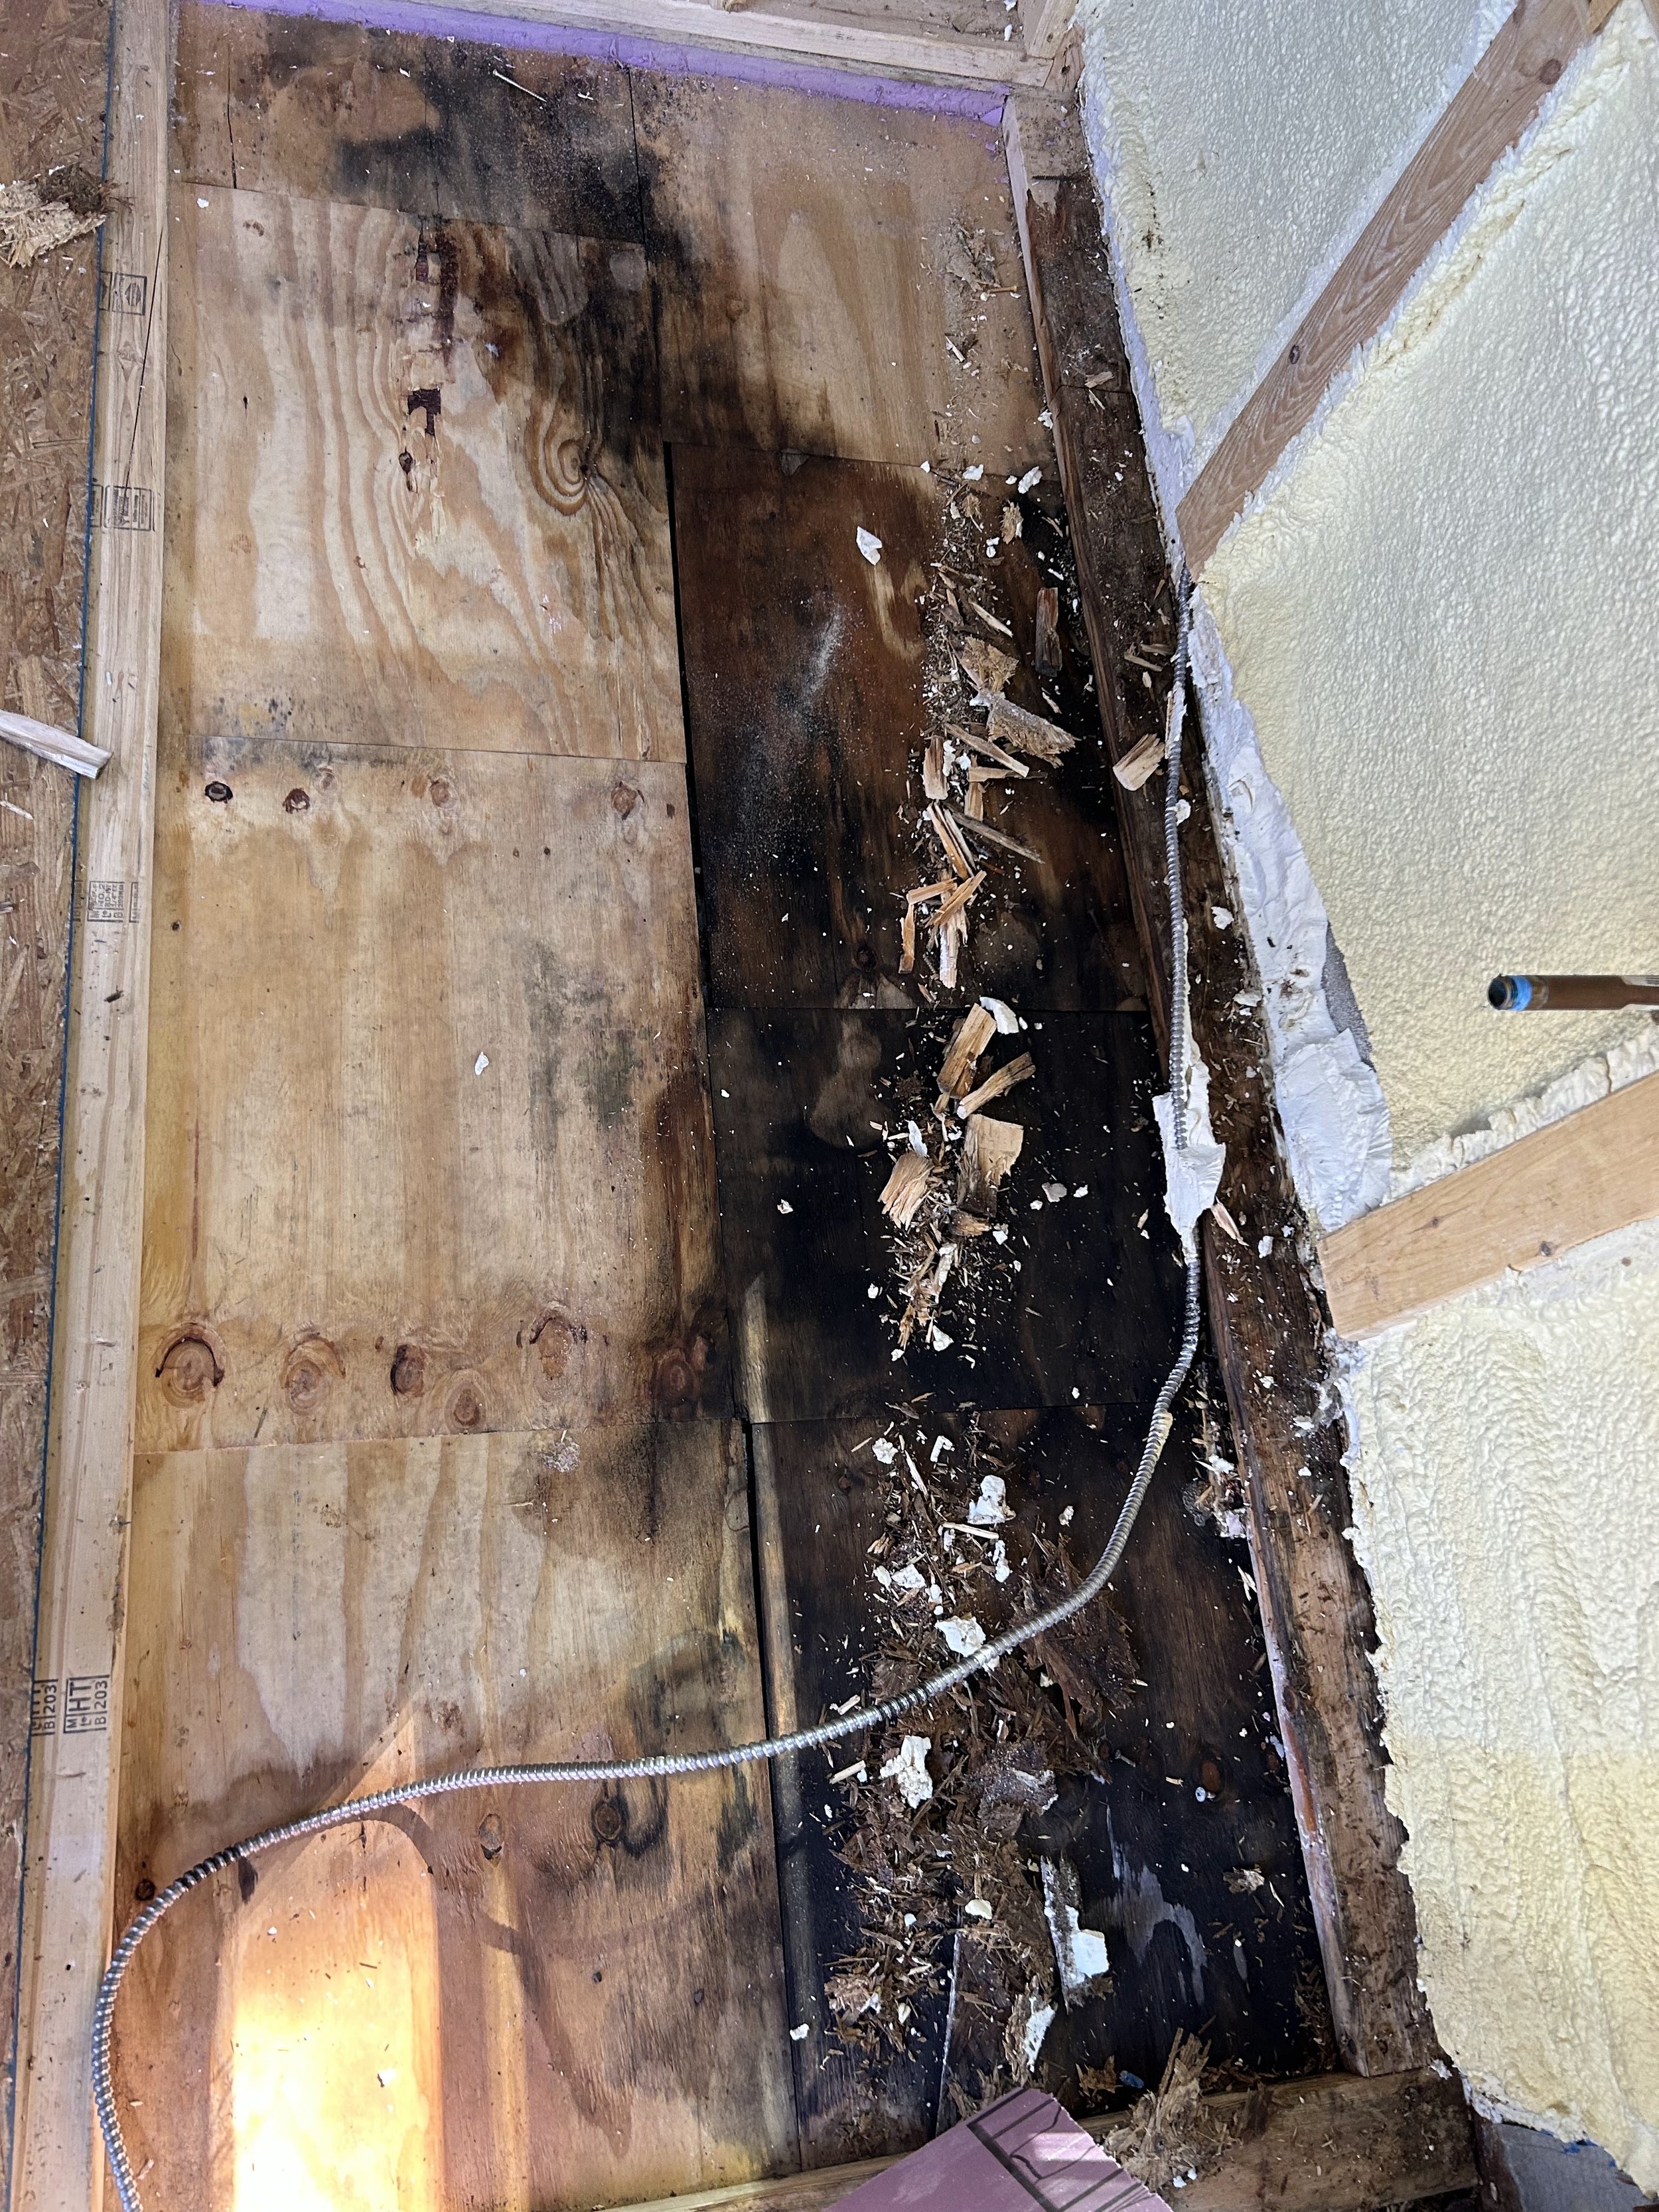
While we hadn’t planned to spend and entire day redoing flooring, we eventually made some forward progress when we also insulated the floor next to the driver seat that hadn’t been covered before. It was only a few feet of progress but at least we don’t have moldy floors. We found out the source of the water was the fresh water inlet spigot that the previous owner installed but never sealed so we patched that up and called it a weekend.


September 9, 2023 - Making Our Bed
We got a late start on Saturday so we only finished the subfloor next to the driver’s seat by securing the plywood on top of the insulation. Sunday was another rainy day so we set up our chop saw under a canopy and got to work building our bed. This process came with a lot of planning and replanning how we wanted to use the space. Since we were working around the previous owner’s bathroom that was now in the center of our living space, we decided to build the bed from wall to wall in the very back of the bus. We left the entire space open underneath for a water tank, solar batteries, our fuse box, and extra storage accessible from the back emergency door.


With the rain and the time it took to plan out our space that was all we accomplished that weekend but it felt like a pretty good start.
September 16, 2023 - Framing Furniture
We decided to build the frames for all of our furniture before putting up our interior walls to cut down on the amount of plywood we would use. We started with the driver’s side furniture and worked from the bed forward. We measured everything out, outlined the silhouette of each piece in painter’s tape and built it all from there.
We made the box frames for each piece of furniture out of 3/4 inch plywood and looking back that was probably a little overkill but everything sure is sturdy. We started with the nightstand, a very simple rectangular box and the first time I had to make pocket holes. By the end of the project, it felt like I had done thousands of pocket holes. I think I might’ve cried once having to re-do one board, using the pocket hole jig was the most tedious thing.


As small and simple as it was, between the trips to Home Depot, the planning, the YouTube tutorial watching, and figuring out our own strengths and weaknesses (drilling pocket holes apparently was both my strength and my weakness), it took us the afternoon to build and then we had to clean up for a birthday dinner.
We started early on Sunday and after measuring 37 times and cutting 36, we had the frame for the couch built. We decided the best use of the open space under the couch was to hold a fresh water tank so we ordered one from Amazon and dropped it in.


As I write this, I realize it looks a little lame for an entire weekend of work but we really did spend a lot of time planning, running to Home Depot, and then having to clean it all up before we went home. It felt more productive than it looks I promise.
September 30, 2023 - Building More Boxes
Apparently we had a box building limit of two per weekend. This particular weekend we had reached the wheel well and had to decide how to incorporate that into our furniture plan. We decided the best use of the space was to build a frame over the wheel and rest a closet on top of that. We drew up the closet in two parts. The bottom part had two small boxes that fit between the wheel well frame and the existing bathroom wall. Those boxes were connected to a long, thinner drawer that rested on the wheel well frame. That would be the base that held up the box that was going to be our closet.


When that was built and in place we started on our closet. The problem with this box was that it was going to have to touch the ceiling. The ceiling curved a lot. Our method for determining how to cut the curve into the top of our closet was primitive but it worked. A vague line drawn by dragging a pencil, eraser touching the ceiling to guide the curve, along the top of the plywood and then re-cutting using the eyeball technique when that didn’t work.


And that was our two boxes of the weekend!
October 8-29, 2023 - Building Two Boxes at a Time and Other Random Tasks
We only worked one day each of these weekends and I can’t remember why. Despite that, we were able to finish building the frames of our bedroom furniture. We switched to the driver side and again built from the bed forward. We had gotten more efficient at this point and built both our dresser and what later became our electronics storage over the other wheel well.


With that, the entire back of the bus that would be our bedroom and living room was framed out.
The weekend of October 15th, Cole worked on finishing our plumbing while I built yet another two boxes: our dinette seats. We planned these to have plenty of storage underneath while sticking out into the kitchen as little as possible.


The weekend after that, we framed those awkward spots beneath the ceiling but above the windshield and emergency door.


The next weekend we put the lid (seat? lid seat?) on the couch and that wrapped up October.


November 11, 2023 - Putting Up the Walls
We decided to leave the shiplap walls that the previous owner put up in the front of the bus and hang 1/4 inch plywood as our walls in the back. It was an easy enough process, cutting for windows and outlets as we went so we had the walls up and painted all in one day. We did also paint the shiplap boards in the front, it freaked people (including myself) out to be covering up the dark stain but honestly it was done so messy and lightening up the walls made it feel like we had a lot more space.


November 18-25, 2023 - The Driver’s Seat and Using Up Our Plywood
Thanksgiving and the weekend before we decided to check some smaller tasks off of our list. We tackled refinishing the driver’s seat, covering the floor where the seat went with a utility mat, and using up some of our plywood to cover the dinette seats, the couch, and those awkward ceiling transition spots above the windshield and emergency door.


March 9 and April 27, 2024 - The Ceiling
“So you just skipped December, January, and February?” No I didn’t, we were in Florida most of December, the bus was at the mechanic all of January, and in February there was too much snow to work on anything but the engine, wiring issues (still), and spray painting the dash.


For the ceiling we used tongue and groove pine boards. We started at the center and worked our way towards the walls, fighting with the curve of the ceiling more and more as we got closer to the edges. At one point we actually got a car jack and used it to push the final boards in place by propping it between the board and the wall.


That was all we had time for before we spent the rest of March planning our wedding, doing decoration DIY’s, and then getting married in early April.
When we got back after our wedding we jumped right back into work. We finished putting up the ceiling boards, cutting holes and pulling wires for lights, and sanding and sealing the boards.


May 3 - May 11, 2024 - Tiling the Bathroom One Year Later
Picking out the river rock tile at Home Depot was so fun I never imagined putting it up would be so drastically not fun. It wasn’t necessarily the fact that none of the tiles fit together and we had to pluck single rocks from sheets of glue to make them the right shape, or that the adhesive got everywhere. It was the grout. The amount of grout it took to seal the giant gaps between these rocks was unfathomable. Then, the rocks tried to absorb every ounce of that grout and after every wipe of the sponge more would spread from who knows where and leave a nice cloudy layer for me to wipe off (and back on) again and again. Its the part of the conversion we get the most compliments on but was it worth it? I was chewing grout, my tears were filled with grout, I still think its in my hair to this day just like it is still on quite a few of those river rocks.


May 25, 2024 - Making Things Functional
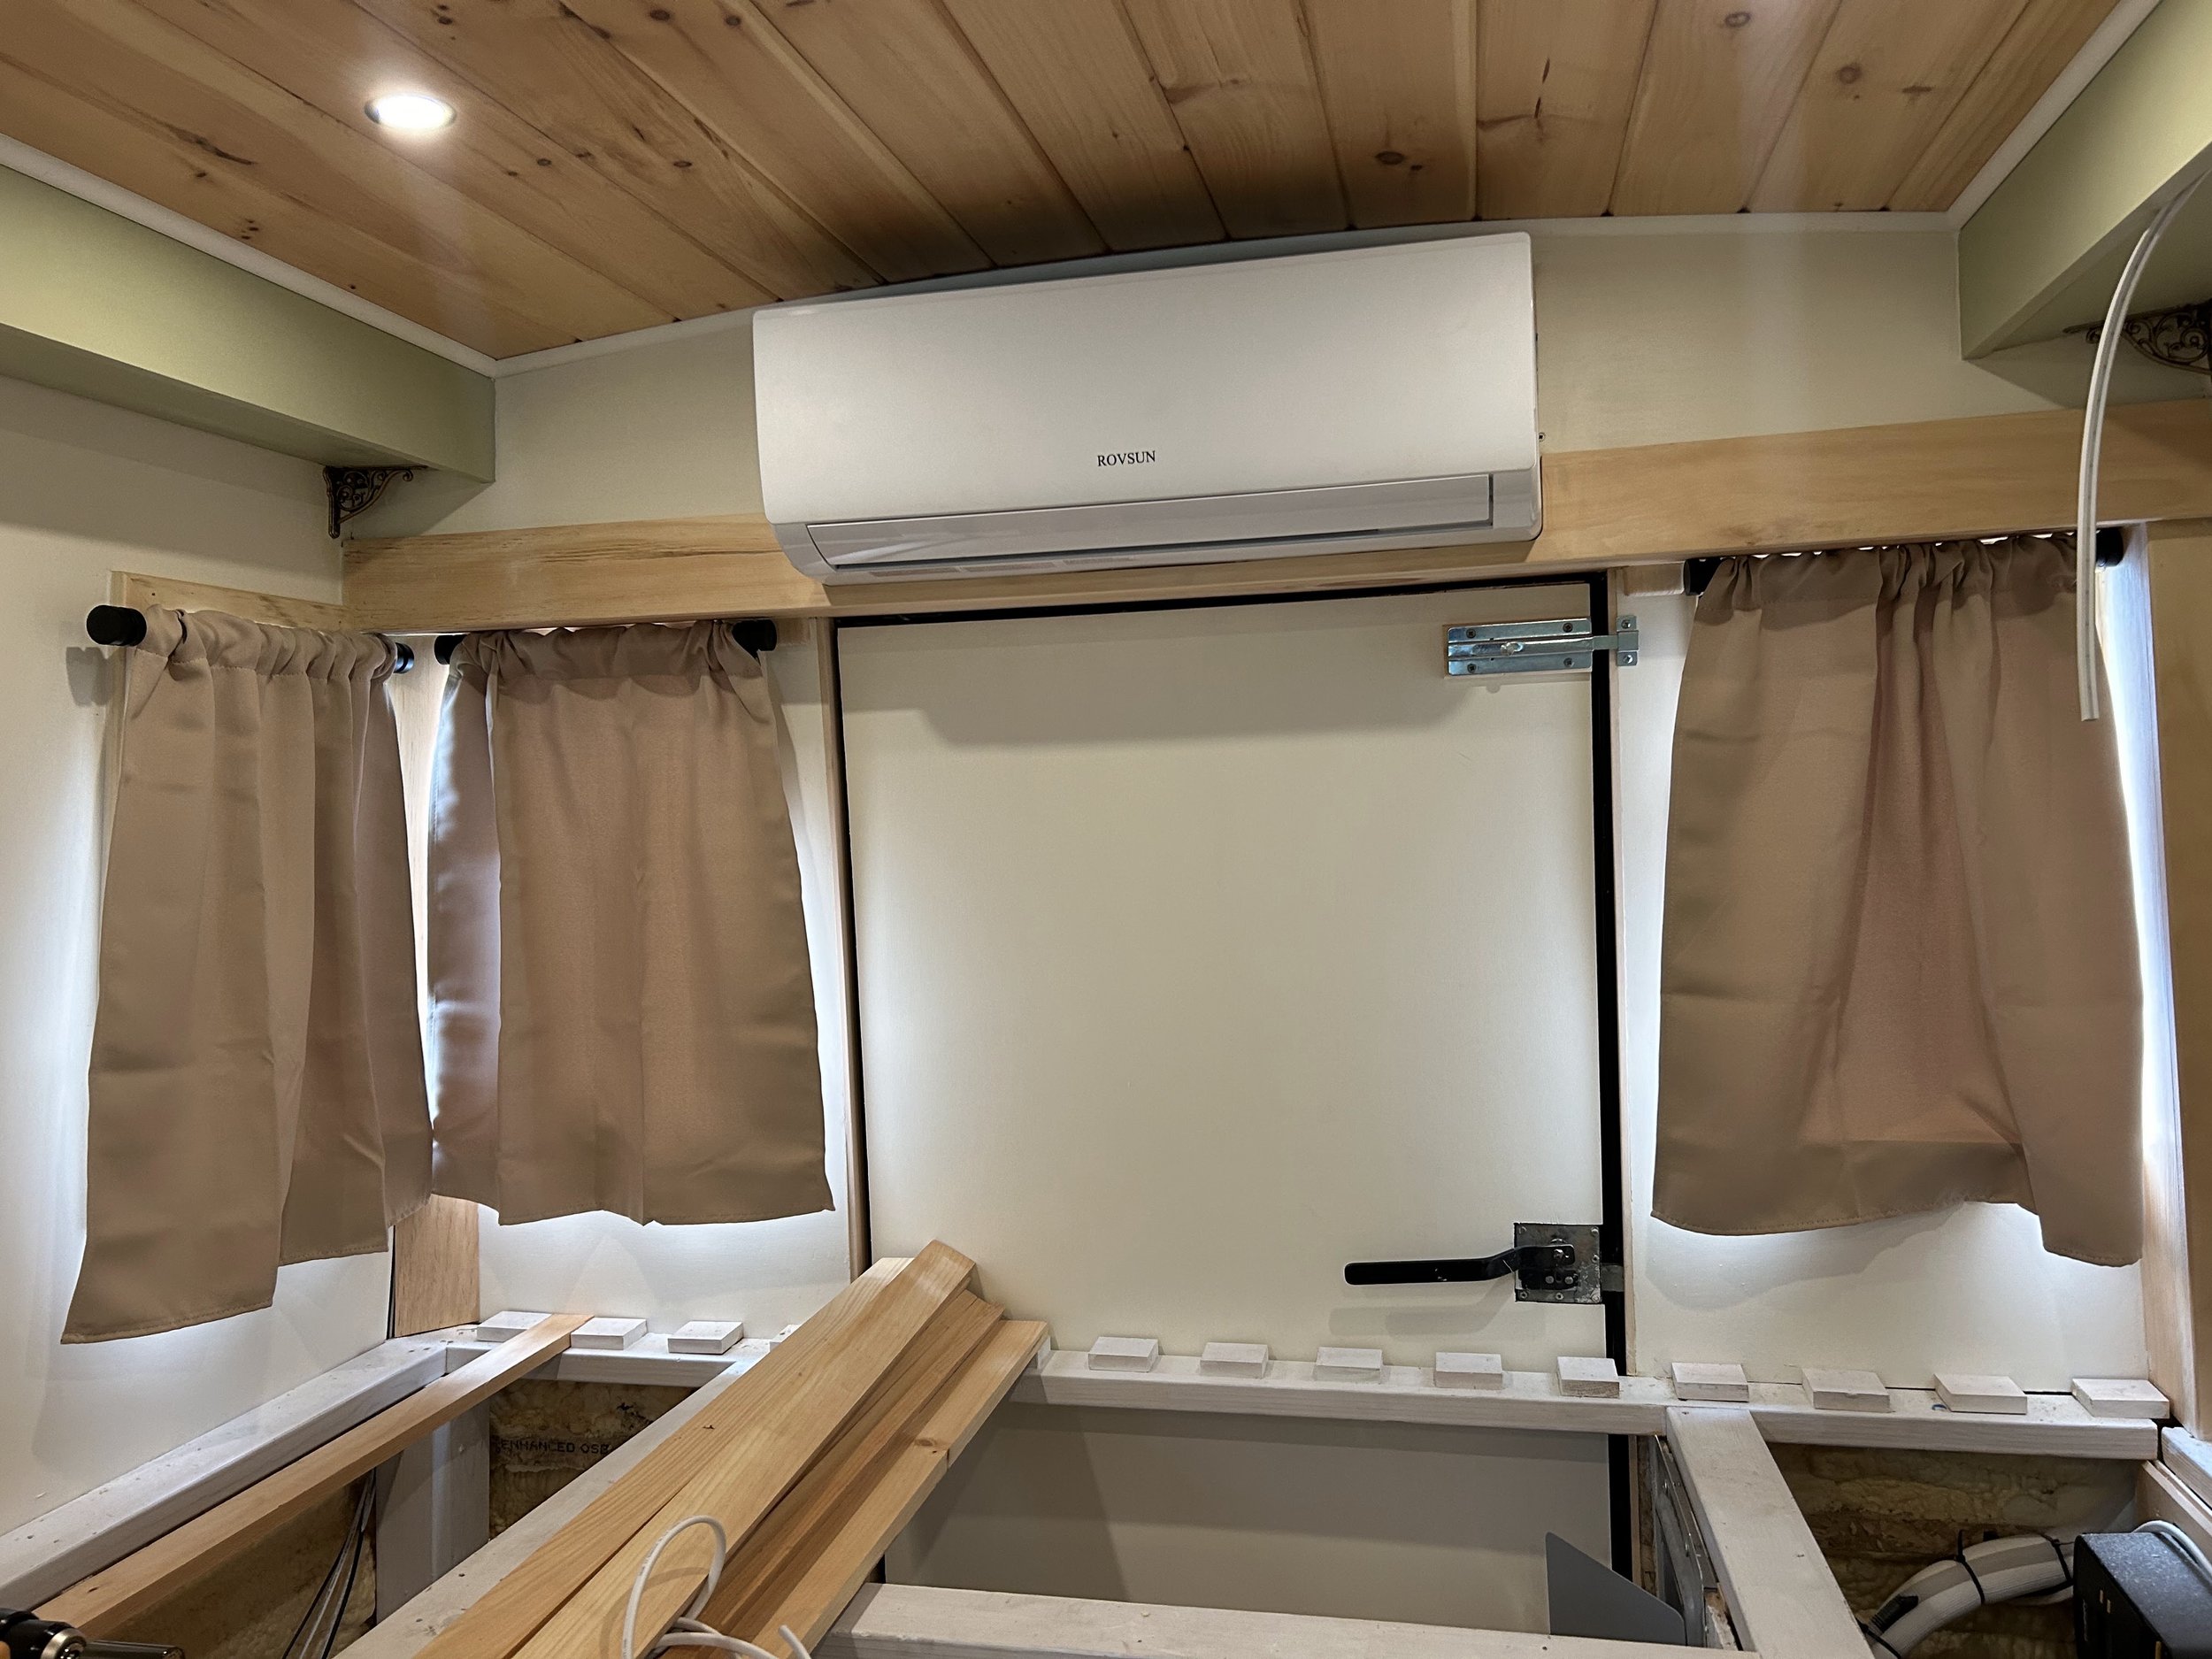
Now that a lot of the foundational work was done, it was time to start thinking about functionality. We started by installing the propane water heater, the toilet, grey and black water tanks, a mini split, and a rack for our propane tanks.
Cole learned to weld to build the cages that held our black and grey water tanks to the bottom of the bus. After plumbing the whole system, and giving it a standard RV dump kit from Amazon, we installed a standard RV toilet. A lot of people who build skoolies opt for a composting toilet but neither of us could commit to that so we accepted the extra work and weight of a water tank system. To finish up the bathroom we added a mirrored medicine cabinet


Next came the mini split, installed right above our bed with the condenser also in a welded frame hanging beneath the bus.


After that, we installed the water heater and a propane tank holder with an accessible hatch underneath the bus.


June 2, 2024 - Trimming Furniture and Building Drawers
To kick off June, we put trim on the front of the furniture frames we had built so far and started learning how to build and install drawers.


We started with the dresser drawers because they would all be the same measurement so we could just cut all of our panels at once and then put them together. Cue more pocket holes than anyone should be forced to drill in their lifetime.


June 8, 2024 - Building Essential Kitchen and Bathroom Storage
It took a lot of planning to come up with how to use our hallway space between the kitchen and bedroom areas. We decided to do a tall pantry with vertical drawers, a shorter cabinet with three shelves, a drawer for our trash can, and an empty, covered slot for our laundry basket to slide in and out of.
Building the pantry frame went well until we brought it into the bus and realized we didn’t even think about cutting the top to fit against the curve of the ceiling. We had to carry it back out, take it apart, and cut the angle in the individual boards. Twice. After that, we built three separate frames that joined together between the pantry and our electronics storage cabinet.


The next day, we built drawers for the nightstand and closet base, and cut drawer faces for everything we had built so far.


June 15, 2024 - Ripping Up the Stairs, Trimming the New Cabinet Frames, and Building Doors
We started the morning of June 15th ripping up the old stair treads to start taking measurements for the panels we were going to use to recover the metal. We spent a lot of time deciding how we wanted to build our closet doors (we ended up rebuilding them differently later), we put trim around the frames of the pantry and cabinets we built the weekend before, and cut and installed a door on the cabinet next to the pantry.


June 22-28, 2024 - Painting, Moving in, and Building Pantry Drawers
The weekend of June 22nd was an exciting one. Our vision started really coming to life with the first coat of paint on the drawers, closet, and cabinets we had built.


The lease on Cole’s apartment was up on July 1st so the last weekend in June we committed to the dream of the bus being our permanent home and moved into his parents’ basement to stay until it was finished. It wasn’t a very productive weekend since we didn’t have a lot of time to do anything besides move, but we did get the two vertical drawers for the pantry built, painted, and installed. We were also able to build an additional three drawers onto our existing base cabinet in the kitchen, and build the drawer for the trash can.


July 6, 2024 - More Painting and Building Countertops
We got our day started later on the 6th because of the holiday weekend, but we spent the whole afternoon and evening painting the last of the cabinets.


The next day, we spent a lot of time planning out our countertops and walking around Home Depot to figure out exactly how we wanted to execute our vision. We ended up gluing and doweling together three individual pine boards to make each countertop. It was a simple process but we had to wait until they were completely dry before we stained and sealed them so with our boards clamped together, we ended our weekend.


July 14, 2024 - Staining the Countertops and Tweaking Previous Work
We found the perfect golden stain and sealant for our countertops and applied our first coat early so we had time to let it dry, apply a second coat, and secure them onto our cabinets all in one day.


After that we spent some time reworking a few things. We rebuilt the closet doors, so they would be lighter and straighter, and we cut holes into the dinette seats so we could easily lift them to get to anything stored underneath. We ended that weekend by painting a coat of mold resistant sealant on our subfloor, getting ready to install our click into place laminate flooring the next weekend.


July 21, 2024 - Installing Flooring
While we spent most of the weekend tent camping at the beach, we were able to complete our floor installation the afternoon we got home. We used simple, Home Depot laminate flooring, the kind you just cut to size and snap into place. It wasn’t a lot of progress, task list wise, but visually, we felt like the conversion was almost done.


July 27, 0224 - Finishing the Dinette Seats, the Emergency Door, and Installing Stair Treads
At this point we were finally getting out of tasks that required two people so we were able to get more done by each taking on a project. On Saturday, I sanded, painted, and put trim on the dinette seats while Cole framed and insulated the back emergency door. When we had both finished that, we worked together to secure a sheet of 1/4 inch plywood to the emergency door and Cole got to work redesigning how the handle operated.


The next day we had another long decision making trip to Home Depot before getting to work refinishing the stairs. We bought stair treads to cut and angle to size, and used leftover ceiling tongue and groove pine to finish the stair walls. Eventually we added stick on tiles from Amazon, you can totally tell they aren’t real tile but only if you’re really paying attention.


August 1-9, 2024 - Painting the Couch, Building the Table, Trimming the Windows, and Finishing the Closet
Things really picked up in August when my in person job ended and I was able to get a lot more work finished during the week. My first task was painting the couch. Then I started putting trim on the inside edges of every window. Cole was home to help install the dining table (that can be turned into a bed), then I finished the closet.
My grandma made custom cushions for both our dinette seats and couch, vacuum sealed them until they almost didn’t exist, and sent them up from Florida in a suitcase. They came out perfect.


To finish the closet I just had to paint the doors, install accessory drawers, staple the cedar sheet to the back to hide the ugly, and install a hang rod. It took me one afternoon and it finally felt like things were looking polished.


August 10, 2024 - Closing the Gaps
The next weekend involved a lot of planning and improvising. It was time to close up the gaps between the walls and ceiling that we had been using to run wires. In the end we decided that we would build a box that rested on decorative shelf brackets over the exposed metal troughs. We wanted the box to serve more of a purpose than just covering up what we didn’t want to see so Cole installed strips of LED lights recessed into the bottom of the box and wired in bluetooth speakers.


After that we had to close the really tough gaps at the front of the bus by building more boxes and attaching plywood to anything that would hold it.


Eventually I worked on these awkward spots during the week to bring everything together for a more finished look.


August 25 - September 8, 2024 - The Finishing Touches
After installing the stove and the sink (plumber’s putty ❤️ ), it was finally time to make things start looking good, not just working good. We started with the exterior bathroom walls, we added a rolling door and some stick on wallpaper from Peel and Paper.


Then it was onto putting rope trim on the couch, putting trim around the outside of the windows, covering the emergency hatches, and putting 1/4 round trim absolutely everywhere.


We’ve added things here and there as we’ve had new ideas or needed something we hadn’t planned out, but for the most part, this was all we had to do. We added blinds from Home Depot where we could fit them and put up curtains from Amazon where we couldn’t. We bought an oversized curtain rod and two large shower curtains to hang in front of the windshield when we are parked and with that, our interior conversion was finished! All that was left to do was prep and paint the outside and install new solar, but that process is getting a post of its own.


Check out our Instagram for a full before and after tour!